

THE ADVANTAGE OF OUR TRUING STAND


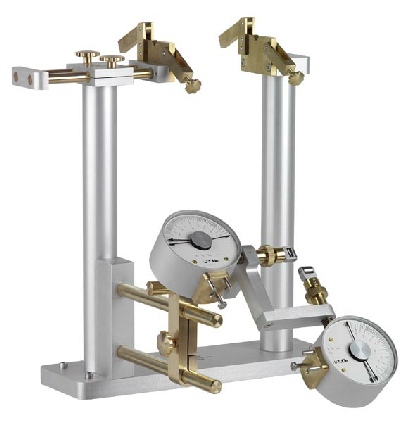
The basis for precise working with measuring gauges provides
the stable truing stand with the wheel holder developed from P&KLie
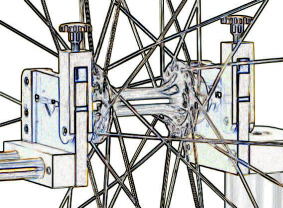
Adjustment hub width:
Is only pushed up against the hub. Because of that you have a precise axsle position and no damage of the hub.
You don’t need to push back the adjustment for unclamping and clamping the wheel. This is important to keep the
measure result if you take out and put in the wheel (for example for stress relieve, serial production).
Wheel holder:
The special developed wheel holder is very important because you can only get good measuring results with a good wheel holder. This wheel holder allows a constant axle position for precise truing. With the brass we don’t damage the axle.
Gauge adjustment:
The gauge is adjusted to the right value with the knurled nut. With our adjustment you don’t need to turn the scale as you do with normal gauges.
Adjustment wheel diameter:
This holder made of brass allows a quick adjustment for different wheel sizes. The gauges are stable fixed with the special clamping.
Sensor:
The developed sensor from P&K Lie allows a precise scanning of the rim. We have also developed them to prevent the rim from demage.
Measuring gauge:
The drag pointers of the truing gauges shows exactly which spokes you must tight or loose. You work faster by tighten or loosen the right spokes and you must not stabilize the wheel so often. This procedure gives the wheel an even spoke tension. With the truing gauges you get proved working results and you can offer constant quality. You work methodical and purposeful. No dishing gauge required.
With conventional dial gauges you must always follow the pointer with your eye, you have no orientation and you must notice the values by yourself.
With mechanical calipers you must estimate the working process and work with feeling. This procedure costs time and the results must be checked with the dishing gauge.


Copyright © 2010 P&K Lie GmbH • Webdesign by Kerstin Lie
| Truing stand |
| Truing stand colors |
| Truing Gauge |
| Truing gauge Special 250 |
| Requirement |
| Center Position |
| Truing |
| Advantage |
| Why |
| Service |
| Instruction |
| Discbrake Tool |
| Tensionmeter |
| Holder |
| Adaptor |
| BaseBox |
| Germany |
| Austria |
| Denmark |
| UK |
| Ireland |
| Italy |
| Spain |
| Swiss |
| Belgium |
| France |
| Sweden |
| Slovenia |
| Australia |
| Korea |
| News |
| Schoolbook |
| Press |
| P&K Lie |
| Contact |
| Imprint |
| Terms and Conditions |
| Right of Withdrawal |
| Data Privacy |